The hidden remove background tool in Microsoft Office: Why most users still do it the hard way
to your Office files.
If this article has made you rethink how your business uses Word, Excel or PowerPoint, ZOARC Creative can help create polished, brand-aligned templates for letterheads, reports, proposals, bids and presentations.
Trusted for Microsoft Office template and formatting support
Most people still open Canva, Photoshop, online background removers or random browser-based tools when they need to remove the background from an image.
The surprising part?
In many cases, they do not need to leave Microsoft Office at all.
PowerPoint, Word and Excel include a built-in Remove Background tool that can quickly clean up images, remove distracting areas and help create more polished documents, presentations and templates. It is not perfect, and it will not replace a professional image editing workflow in every situation, but for everyday business use, it is far more capable than most users realise.
The reason it is often missed is simple: it is slightly hidden. Unless you select an image and know where to look, you may never notice it.
For teams creating sales decks, reports, proposals, training documents or branded templates, this small Office feature can save time, reduce dependency on external tools and keep the workflow inside the applications people already use every day.
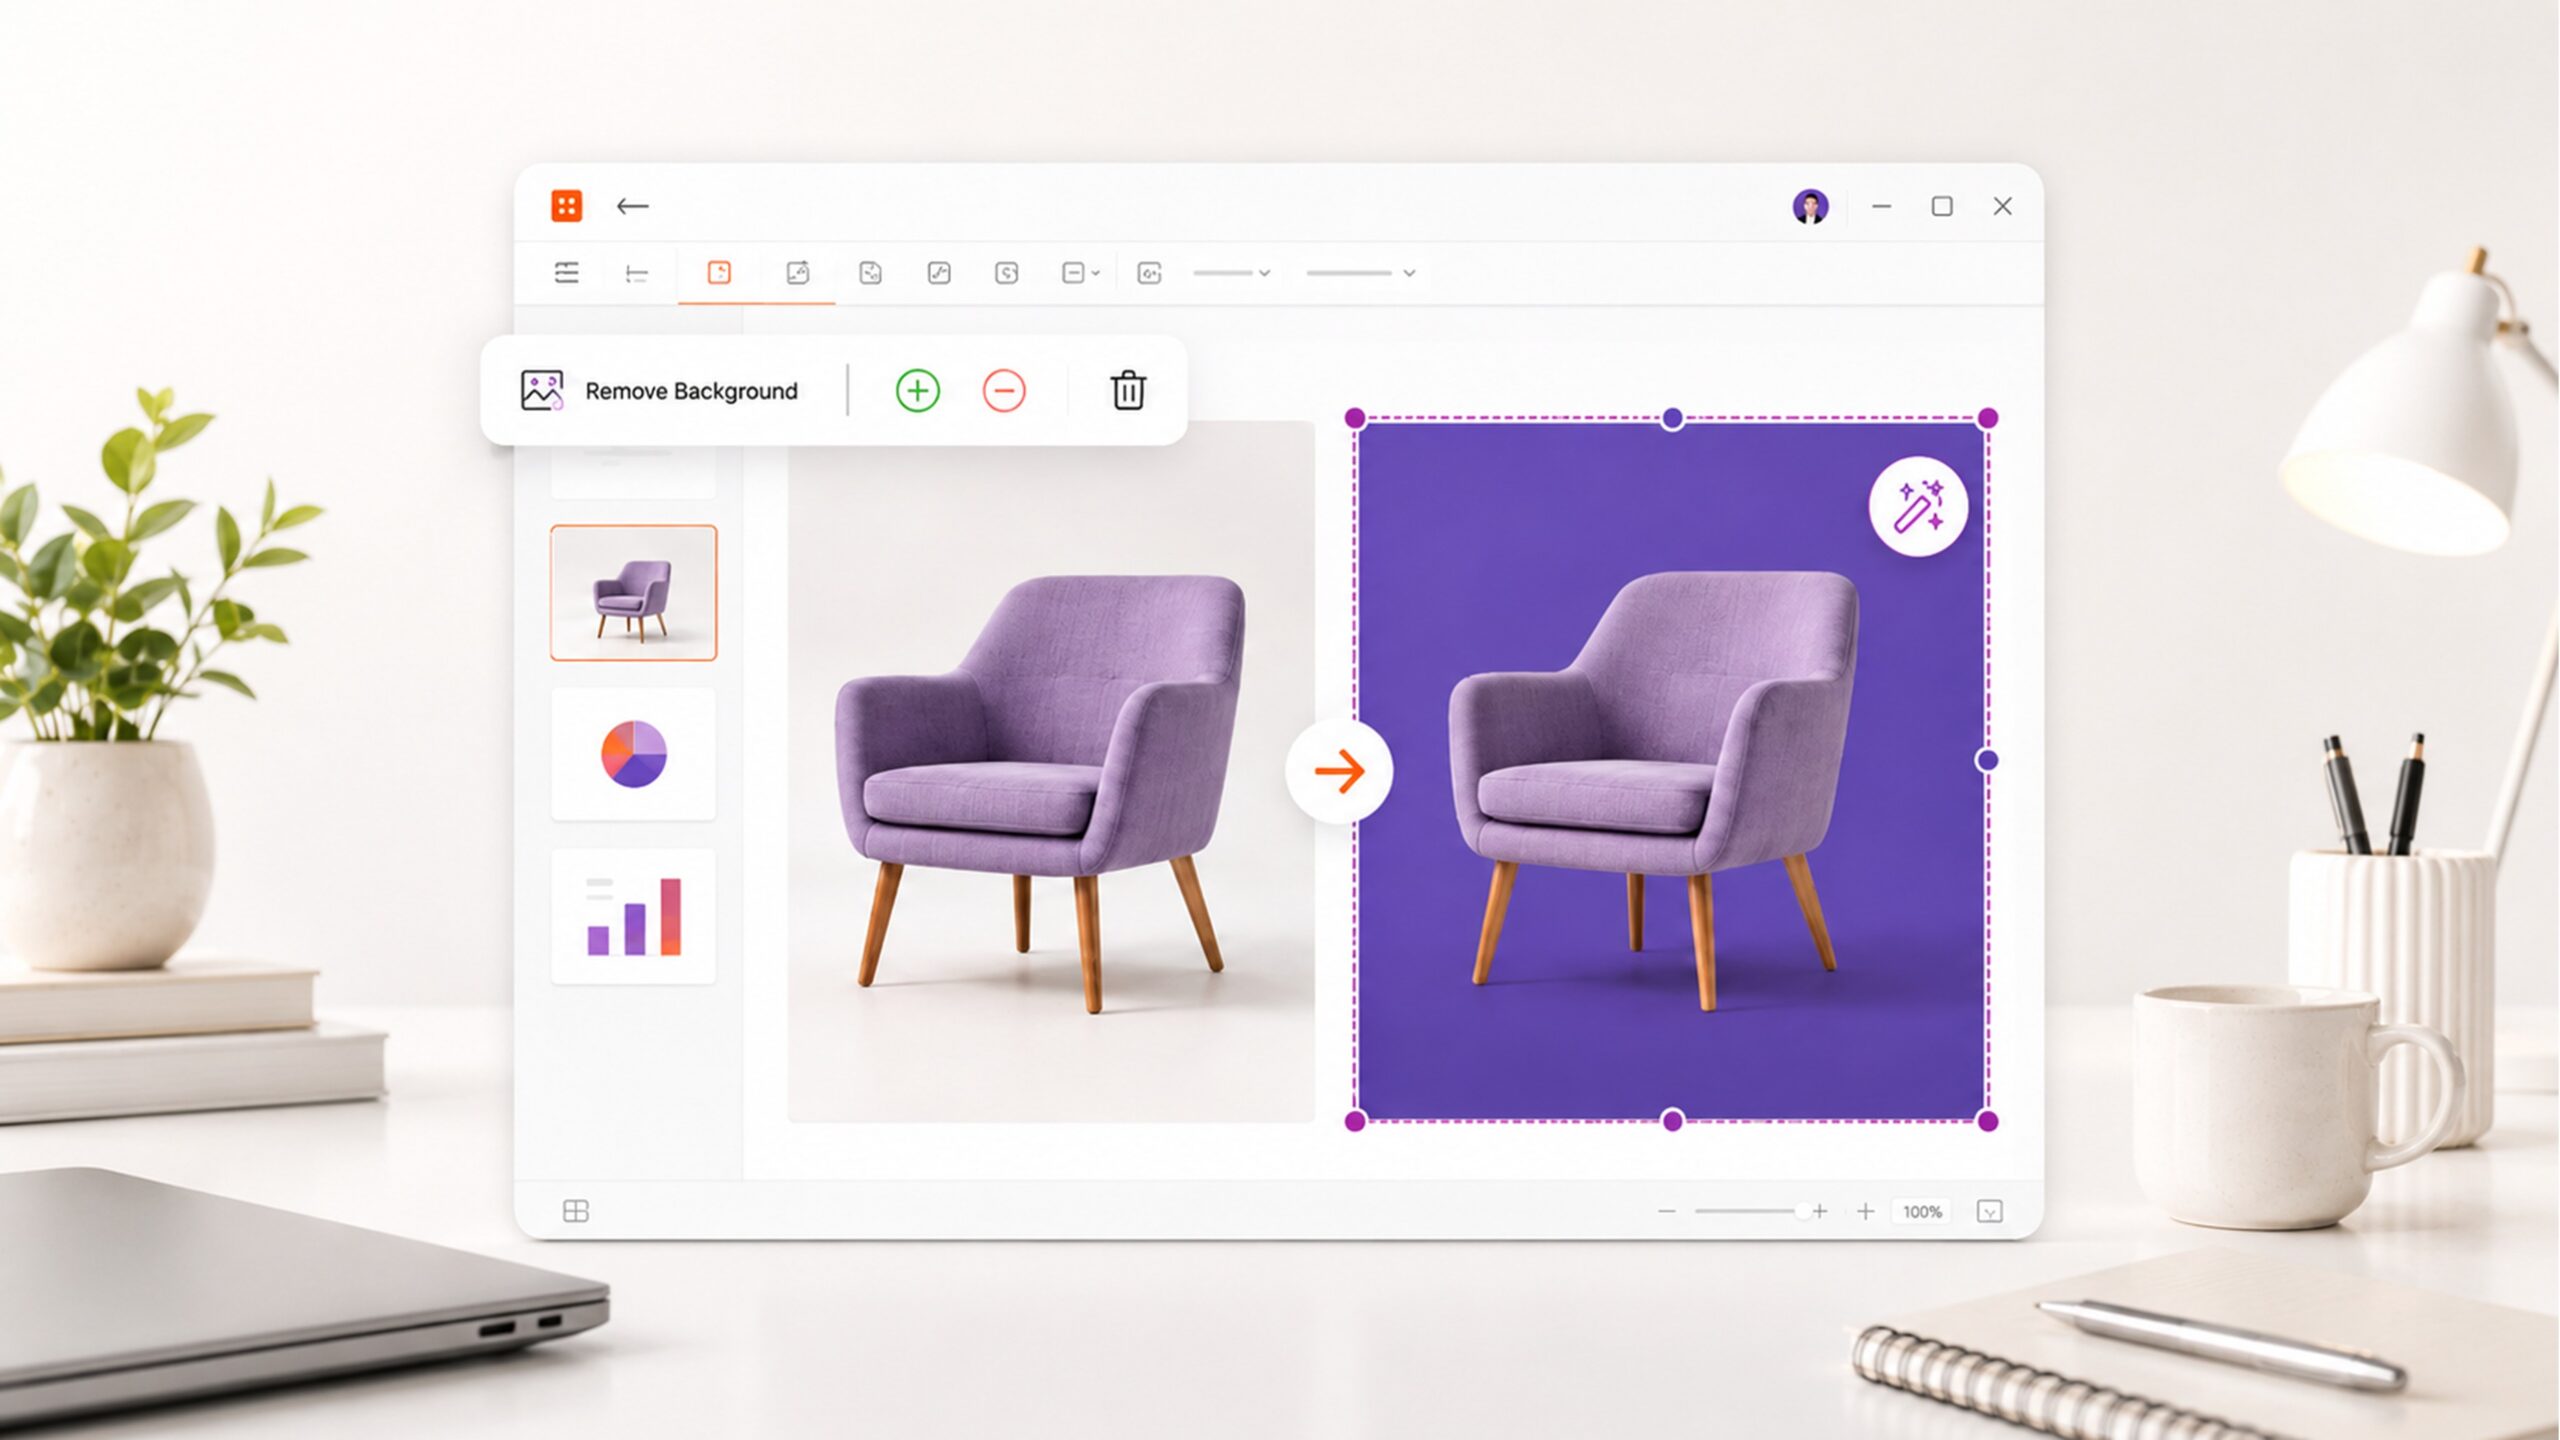
To find it, insert or select an image, go to the Picture Format tab, and select Remove Background. Office will highlight the area it thinks should be removed, usually in magenta. Anything left in its normal colour is the part Office intends to keep.
That first selection is not always perfect, but that is also where many users misunderstand the tool. They click it once, see that the cut-out needs work, and assume it is not good enough. In reality, the automatic result is only the starting point.
The real value comes from refining the selection.
The Remove Background tool is not meant to be judged by the first click. It works best when you guide it using Mark Areas to Keep and Mark Areas to Remove.
When you use Mark Areas to Keep, you are telling Office which parts of the image should remain. This is useful when it has accidentally removed part of the subject, such as a handle, product edge, sleeve, logo or fine detail.
When you use Mark Areas to Remove, you are telling Office which remaining parts of the background should disappear. This is useful when it has kept a patch of wall, shadow, table surface or surrounding clutter.
Think of it less as a one-click magic button and more as a quick cut-out tool built directly into Office. You give it a starting point, then correct the areas it has misunderstood.
This is where the tool becomes genuinely useful.
A product photo can be cleaned up before being placed on a branded slide. A staff image can be made to sit more naturally inside a proposal. A screenshot or object can be separated from its original background and placed into a cleaner layout.
None of this necessarily needs a separate design application.
Why most users still miss it
One reason is that most users do not expect Microsoft Office to include this kind of image editing feature. They think of PowerPoint as a presentation tool, Word as a document tool and Excel as a spreadsheet tool. Image editing is something they assume belongs elsewhere.
Another reason is that the feature is contextual. If an image is not selected, the option is not obvious. It appears only when Office knows you are working with a picture.
There is also a habit issue. Many teams already have a workflow for removing backgrounds, even if that workflow is clunky. They upload the image somewhere else, download the edited version, reinsert it into the document, resize it, compress it, crop it and then hope it still behaves properly inside the file.
For one image, that might not seem like a problem. Across a large presentation, report or proposal, it becomes inefficient very quickly.
The more steps there are, the more likely something is to go wrong. The image may be saved at the wrong size. It may be compressed too far. It may be inserted with inconsistent spacing. It may sit awkwardly on the page because it was never prepared for the layout in the first place.
Most users are not doing it the hard way because they want a complicated workflow. They are doing it because they do not know Microsoft Office already has a built-in option for many everyday image clean-up tasks.
The tool works best when the subject is clearly separated from the background. Product images on plain backgrounds are a good example. So are staff photos with clear contrast, objects on a simple surface, or images that need to sit on a colour block in a presentation.
It can also be helpful in sales decks, event slides, training materials, reports, proposals and client-facing documents. These are the kinds of files where images often need to look clean, but do not always need advanced retouching.
For everyday business use, “good enough” is often exactly what is needed.
Where it works particularly well
PowerPoint is probably where the tool has the biggest impact.
A common problem in business presentations is that images are dropped onto slides without being properly integrated. A photo with a white box around it sits on a coloured background. A product image looks like a pasted screenshot. A staff photo feels disconnected from the rest of the design.
Removing the background can instantly make the slide feel more considered.
It allows the image to sit directly on the slide background. It can overlap shapes, sit inside an infographic, work with a gradient or appear as part of a more deliberate composition. The slide feels designed, rather than assembled.
This is especially useful when creating branded PowerPoint templates. A good template is not only about fonts, colours and slide masters. It is also about giving users practical ways to create clean, consistent slides without needing a designer every time.
A strong PowerPoint template should not only look good in the sample deck. It should help real users create better slides when they start adding their own content, images and screenshots.
Word benefits from this more than people expect.
Although Word is not usually seen as a design tool, it is often used for highly visual business documents: reports, proposals, credentials documents, case studies, policy documents, letterheads and client-facing templates.
A messy image background can quickly make a Word document feel less polished. Removing the background can help create cleaner covers, profile pages, service pages and visual callouts.
For example, a proposal template might include a product image, project photo or team member portrait. If that image can be cleaned up directly in Word, the end user does not need to prepare the image elsewhere before using the template.
That makes the template more realistic for non-design teams.
Excel may seem like the least obvious place for this feature, but it can still be useful. Dashboards, trackers and reporting packs often include logos, icons, product images or visual indicators. If an image has an unwanted background, it can make the sheet feel untidy.
Using Remove Background directly in Excel can help clean up these visuals without switching tools.
It is not something every spreadsheet needs, but for branded dashboards or management reporting packs, small visual improvements can make a noticeable difference.
When the tool is not the right answer
There are limits.
The Remove Background tool may struggle with busy backgrounds, low-resolution images, hair, fur, transparent objects, soft shadows, fine line details or images where the subject and background are very similar in colour.
This is not really a failure of the tool. It simply means the image is too complex for a quick Office-based clean-up.
In those situations, Photoshop, Canva or another specialist tool may still produce a better result. If the image is being used in a major campaign, printed collateral, a hero visual or a high-value design piece, it may be worth using a more advanced workflow.
The important thing is knowing when Office is enough and when it is not.
The Office Remove Background tool is not about replacing professional design software. It is about knowing when a simple edit can be done directly inside PowerPoint, Word or Excel without adding unnecessary steps.
There is also one common technical point to understand: the tool works on pictures, not every visual object in Office.
If the Remove Background button is not available, check what you have selected. You may be selecting a shape, icon, grouped object, chart, SmartArt, SVG or background element instead of a standard image.
This is one of the reasons users think the feature has disappeared. It has not necessarily disappeared; Office may simply not recognise the selected item as a picture that can use that command.
A practical example
Imagine you are preparing a PowerPoint slide for a client presentation.
You have a product photo, but it was supplied with a pale grey background. Your slide uses a dark branded colour block. If you place the image directly on the slide, the grey rectangle is obvious and the design looks unfinished.
Instead of opening another application, you can insert the image into PowerPoint, select it, go to Picture Format > Remove Background, adjust the selection using the keep and remove tools, and then select Keep Changes.
The product can now sit directly on the branded background.
For one slide, this saves a few minutes. Across a full pitch deck, it can save much more.
The same thinking applies to Word documents. A team profile image can be cleaned up before being placed on a credentials page. A project image can be used more effectively on a cover page. A product or service image can sit inside a designed callout without carrying an unwanted background with it.
In Excel, a logo or small visual marker can be made cleaner inside a dashboard or reporting sheet.
These are not dramatic design changes. They are small improvements that help business files feel more polished.
The value of this feature is not only speed. It also helps images feel like they belong inside the document, rather than looking as though they were pasted in at the last minute.
For better results, start with the best possible image. A clear, high-resolution image with good contrast will always work better than a small compressed screenshot.
Crop the image first if there is a lot of unnecessary space around the subject. This gives Office a clearer area to work with.
Zoom in while refining the selection. Small details are easier to correct when you are not working at full slide or page view.
Keep a copy of the original image before making changes, especially if you are experimenting. A simple duplicate gives you a safe fallback.
Be careful with shadows. Sometimes removing the entire shadow makes the image look flat. In other cases, keeping a messy shadow makes the cut-out look untidy. The right answer depends on the final layout.
Most importantly, check the result on the actual background where the image will be used. A cut-out that looks fine on a white page may show problems once placed on a dark colour block.
Why this matters for templates
For organisations, the Remove Background tool is more than a design shortcut. It is also a workflow improvement.
Every time a user leaves PowerPoint, Word or Excel to edit an image elsewhere, there is more room for inconsistency. The image might be downloaded in the wrong format. It might be saved at the wrong size. It might be compressed too much. It might be reinserted in a way that breaks the intended layout.
When simple edits can happen inside Office, the process becomes easier to control.
This is particularly important for template design.
A template should not only look good when it is first delivered. It should continue to work when real users start adding real content. That includes imperfect images, rushed edits, last-minute screenshots and content supplied by different teams.
Small built-in features like Remove Background can make templates more practical, especially for teams that do not have regular access to design support.
A template is only successful if people can use it properly after the designer has handed it over.
For designers and template developers, this feature is worth understanding because it affects how users work with branded files.
A beautifully designed PowerPoint or Word template can still fall apart if users do not know how to handle images. They may paste in screenshots, use poor-quality cut-outs or place images in ways that clash with the design.
By building templates with realistic user behaviour in mind, and by showing users small features like Remove Background, you make the template more resilient.
This is the difference between a template that only looks good in the design file and a template that works in the real world.
Final thoughts
The Remove Background tool in Microsoft Office is not new, and it is not perfect. But it is one of those features that can quietly make a big difference.
It helps users clean up images, improve presentation slides, create more polished documents and reduce reliance on external tools for simple editing tasks.
Most importantly, it keeps the workflow inside Microsoft Office.
For teams that live in PowerPoint, Word and Excel every day, that matters.
The next time you are about to open another tool just to remove a background, try selecting the image first and checking the Picture Format tab. The feature you need may already be there.
Need smarter Microsoft Office templates?
Knowing small Office features is useful. Building them into a reliable, branded template system is where they become genuinely valuable.
At ZOARC Creative, we design and build bespoke Microsoft Word, PowerPoint and Excel templates that are not only visually aligned with your brand, but also practical for the people who need to use them every day.
That includes PowerPoint templates and slide masters, Word report and proposal templates, Excel reporting templates, Quick Parts, custom ribbons, formatting systems and template guidance.
If your team spends too much time fixing slides, reformatting documents or working around templates that are difficult to use, it may be time to rethink how your Microsoft Office files are built.
Need branded Word, PowerPoint or Excel templates that are easier for your team to use? Book a call with ZOARC Creative.
Explore more...
- ±8 minutes read
- ±5 minutes read
- ±10 minutes read

- ±8 minutes read

- ±7 minutes read

- ±7 minutes read